12.3. Create a new user
User shall have ROLE_ADMIN to create a new user.
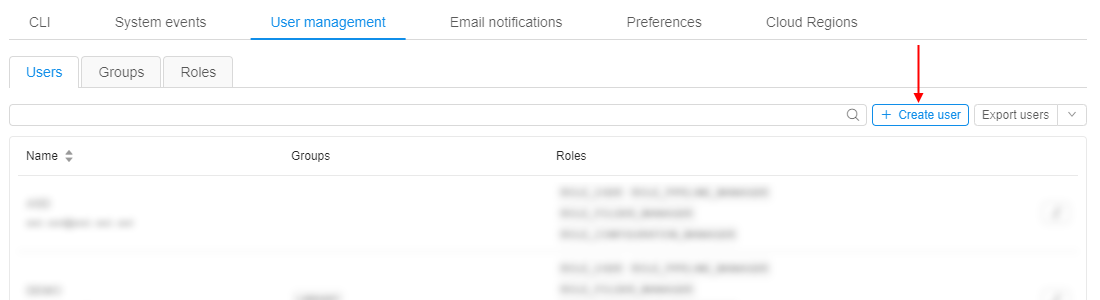
Create a new user manually
- Navigate to User management tab.
- Click + Create user control.
- The Create user form will be opened. This form contains the following sections:
- Name - a new user's name.
- Default data storage - drop-down list suggested a default data storage to the created user.
- Assign group or role - drop-down list suggested the existing roles and groups assign.
- View of roles and groups that are assigned to a new user.
Note: the groups and roles, marked as default, will be shown.
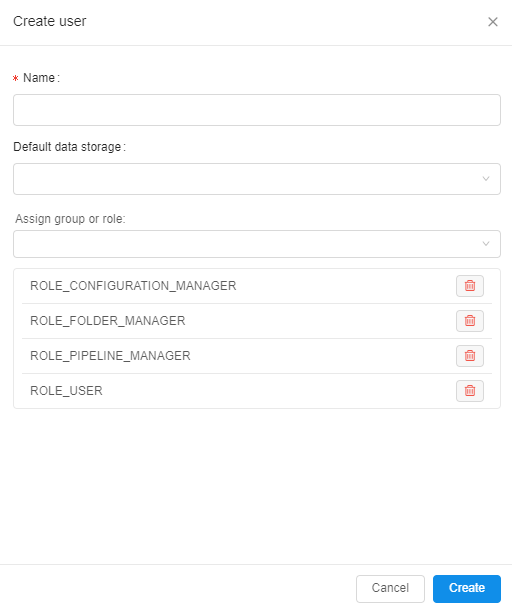
- Enter a name for the new user.
Note: there is no restriction to username format, but it is highly recommended to name a user according to your SSO scheme. - Select a default data storage if it is necessary.
- Select desired groups and roles to assign the new user.

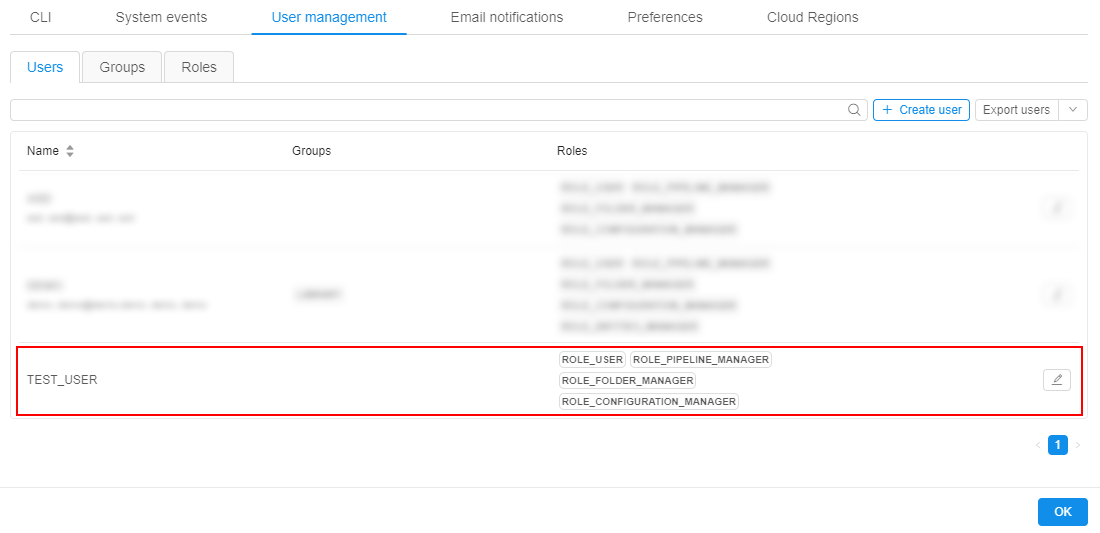
- Click the Create button and the new user will be displayed in the Users tab table.
Users batch import
Described above mechanism allows creating users one-by-one via the GUI. If a number of users shall be created - it can be quite complicated to perform those operation multiple times.
To address this, the special ability is implemented in the Cloud Pipeline - an import users from a CSV file using GUI and CLI.
CSV format
CSV format of the file for the batch import (with examples):
UserName,Groups,<AttributeItem1>,<AttributeItem2>,<AttributeItemN>
<user1>,<group1>,<Value1>,<Value2>,<ValueN>
<user2>,<group2>|<group3>,<Value3>,<Value4>,<ValueN>
<user3>,,<Value3>,<Value4>,<ValueN>
<user4>,<group4>,,,
Where:
- UserName (mandatory column) - contains the user name. This column can't contain empty values
- Groups (mandatory column) - contains the "permission" groups, which shall be assigned to the user. This column may contain empty values for the users (in this case - no groups will be added). Also this column may contain several values for one user separated by vertical line (
|) <AttributeItem1>,<AttributeItem2>,<AttributeItemN>- set of other optional columns, which correspond to the user attributes (they could be existing or new)
Batch import approach
The import process takes a number of inputs:
CSVfile- Users/Groups/Attributes creation options, which control if a corresponding object shall be created if not found in the database. If a creation option is not specified - the object creation won't happen:
- "
create-user" - "
create-group" - "
create-<ATTRIBUTE_ITEM_NAME>"
- "
The inputs are then processed in the following manner:
- If the user with UserName does not exist:
- If "
create-user" is specified - the user shall be created - Otherwise - skip such user
- If "
- If the user is not a member of one of the groups, listed in Groups - the user shall be added to the group(s)
- If one of the group(s) does not exist:
- If "
create-group" is specified - the group shall be created and a user shall be assigned to that group - Otherwise - skip the group
- If "
- For each of the
<AttributeItemX>the following actions shall be performed:- If the user does not have an attribute with the name
<AttributeItemX>and the attribute's name does not match any existing "SYSTEM DICTIONARY" - it shall be added with a corresponding value - If an attribute already exists, but the value is different - it shall be updated with a corresponding value (for the cases, when the attribute's name does not match any existing "SYSTEM DICTIONARY")
- If an attribute is an existing "SYSTEM DICTIONARY" and a value is linked to another dictionary - this link shall be handled in the same manner as GUI does (i.e. another attribute shall be added/updated, according to the link)
- If an attribute is an existing "SYSTEM DICTIONARY" and a value does not exist in that dictionary:
- If "
create-<ATTRIBUTE_ITEM_NAME>" is specified (where "<ATTRIBUTE_ITEM_NAME>" shall match the column name) - the value shall be added as a new dictionary entry - Otherwise - skip the Attribute item
- If "
- If the user does not have an attribute with the name
- If one of the values is empty (i.e. Groups,
<AttributeItemX>) for a specific user - this field shall be skipped (like "user3" and "user4" in the example above)
Example CSV
The following CSV file will be used for the further import example:
UserName,Groups,billing-center,import_attr1
IMPORT_USER1,IMPORT_GROUP1,Center1,import_attr1_val1
IMPORT_USER2,IMPORT_GROUP2,Center1,import_attr1_val2
IMPORT_USER3,IMPORT_GROUP1|IMPORT_GROUP2,Center2,import_attr1_val3
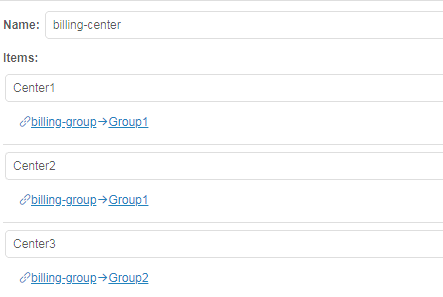
Let's assume that the System Dictionaries configuration contains two dictionaries:
billing-groupGroup1Group2
billing-centerCenter1→Group1Center2→Group1Center3→Group2
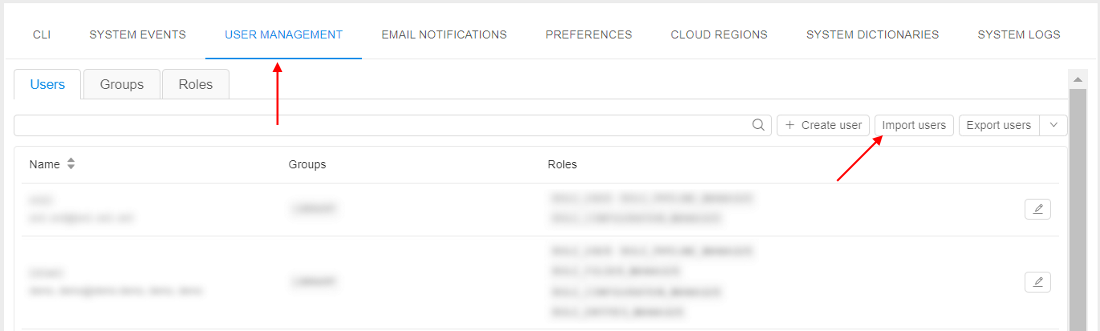
Import users
- Open the USER MANAGEMENT tab of the System Settings page.
- Click the "Import users" button:
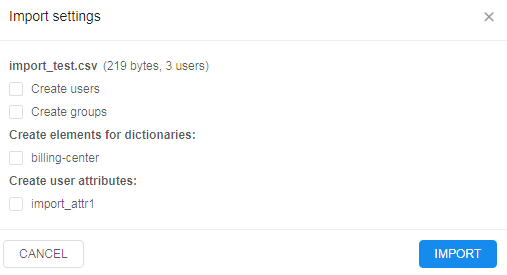
- You will be prompted to select a
CSVfile for the import (here we use the example CSV, shown above) - The GUI will ask to the creation options selection (see Processing logic section for the details):
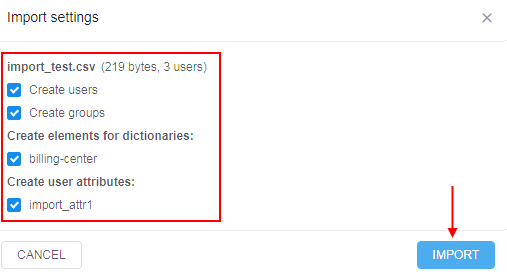
- Select the creation options (here we are ok to create everything: users, groups, billing centers and assign new attribute to the users) and click the IMPORT button:
Note: to import users via CLI see here.
Import results review
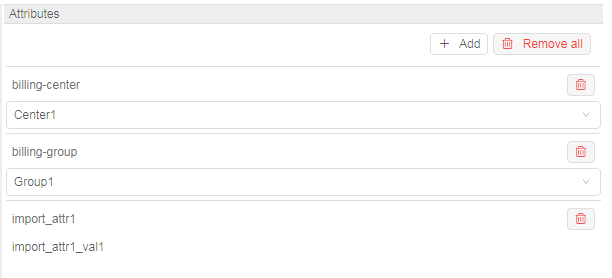
Once the import is done (via GUI or CLI) - review the import results:
- Users and groups have been created
- Users were assigned to the newly create groups

- Attributes were assigned to the users as well:
- A random
import_attr1attribute was assigned as a plain text value, as there is no corresponding SYSTEM DICTIONARY billing-centerattribute was assigned from the corresponding SYSTEM DICTIONARYbilling-groupwas assigned as well even if it is not specified in the CSV file, as theCenter1is mapped to theGroup1(see example CSV description section above)
- A random