12.6. Edit a group (role)
User shall have the ROLE_ADMIN role to edit groups/roles.
Edit a group (role)
For edit a group/role:
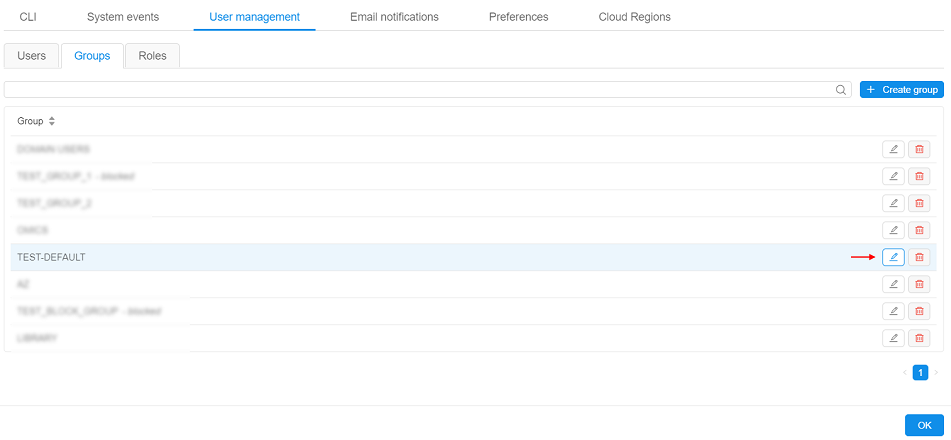
- Open the Groups/Roles subtab in the User management section of the system-level settings.
- Find a group (role).
- Click the Edit button in the row opposite the group/role name:

- Pop-up window will be shown:
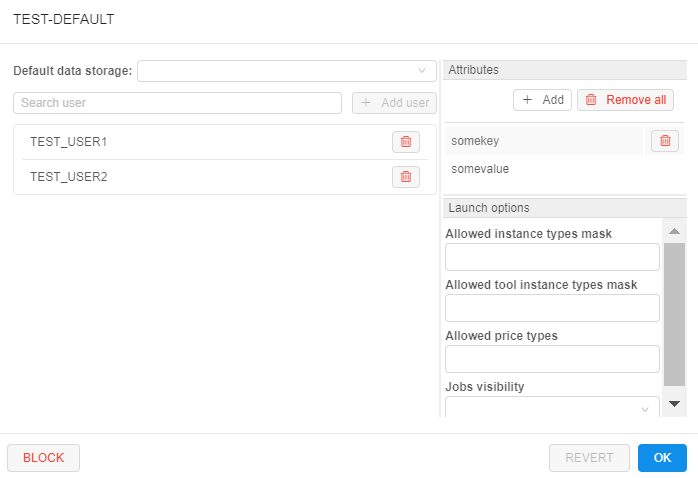
At this form, there are several blocks of the settings for a group/role.
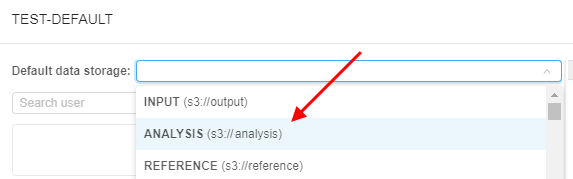
Default data storage
Here you can select default data storage for a group/role:
User management
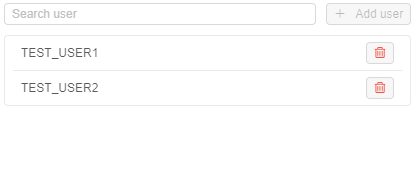
In this block, you can change a members list of the opened group/role:
For more information see 12.8. Change a set of roles/groups for a user.
Attributes
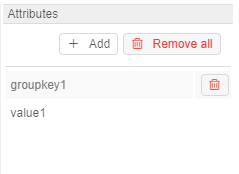
In this block you can set metadata tags (attributes) for a group. These tags represent key/value pairs, same as pipeline/folder tags. For more information see 17. CP objects tagging by additional attributes.
Launch options
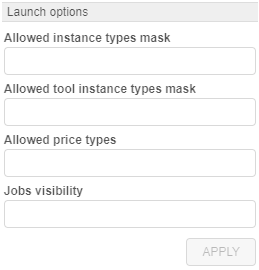
In this block you can specify some restrictions for a group of users/role on allowed instance types, price types, jobs visibility, etc.
To apply configured launch options for a group/role, click  button in the right bottom corner of the pop-up. This action will save all made changes in the group/role settings (not only launch options) and close the pop-up.
Allowed instance count
This setting (Allowed instance max count) allows to restrict the number of instances that members of a particular group/role can run at the same time.
This is useful to address any bugs as the users' scripts may spawn hundreds of machines without a real need.
Note: this restriction is not applied to the users with the ROLE_ADMIN role.
Behavior is configured by the following way: for example, if this setting for the group/role is specified to 5 - then each member of that group/role can launch only 5 jobs simultaneously. This includes worker nodes of the clusters.

If the member of the group/role tries to launch a job, but it exceeds a current limit for members of a such group/role - the warning and errors will be shown.
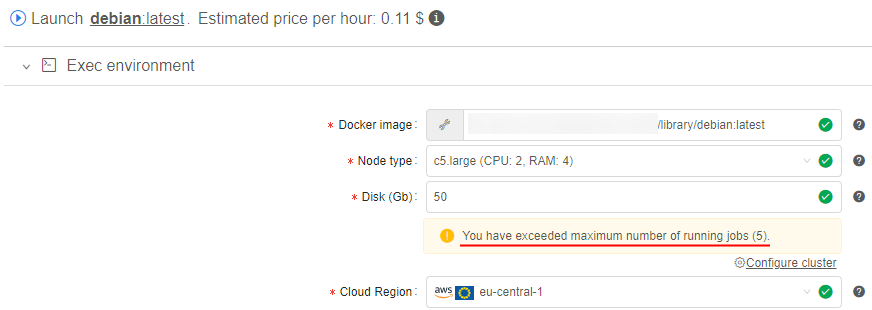
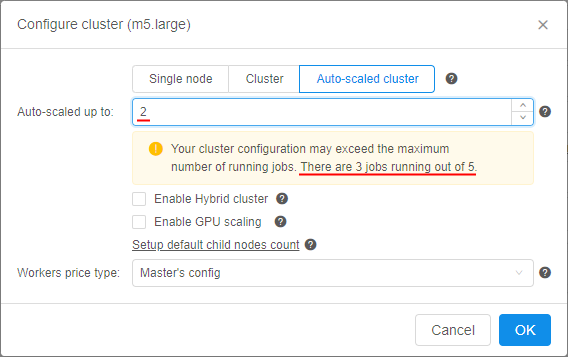
Imagine that the member of a group has already launched 5 jobs with the set groups's limit also equal 5.
That user starts a new instance (which is going to be a 6th job from this user):
- GUI will warn the user at the Launch page:
- GUI will warn the user, before submitting a job:
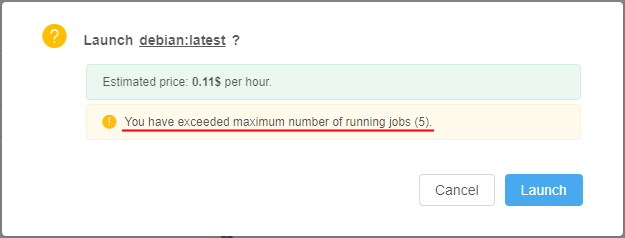
- If the user confirms a run operation - it will be rejected:

Similar warnings are shown if the member of that group will try to start a cluster or an autoscaled cluster.
In this case, even if there are some spare slots, but the preparing cluster may exceed it eventually - the corresponding warning will appear. E.g., imagine that member of the group has already launched 3 from 5 allowed jobs and tries to start an autoscaled cluster:
Note: if user has reached the group/role limit, warning will be also shown in case when that user will try to start a new job via
pipeCLI. Job will be rejected, e.g.:

Such restrictions could be set not only for a group/role, but on another levels too.
Next hierarchy is set for applying of instances max count (in descending order of priority):
- User-level - i.e. specified for a user. This overrides any other set limits for a particular user. How to configure see here.
- User group level - i.e. specified for a group/role. Count of jobs of each member of the group/role is summed and compared to this parameter. If a number of jobs exceeds a limit - the job submission is rejected. How to configure - described above.
- (global)
launch.max.runs.user.global- can be used to set a global default restriction for all the users. I.e. if it set to 5, each Platform user can launch 5 jobs at a maximum. See 12.10. Manage system-level settings for details.
Allowed instance types
Here, there are two settings that can restrict allowed instance types for a specific group/role:
- Allowed instance types mask - this mask restricts allowed instance types for launching tools, pipelines and configurations (i.e. for any run from the member of this group/role).
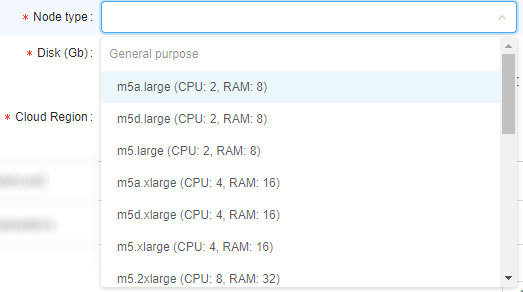
Example of usage: if you want members of the group/role to be able to launch runs with only "m5..." instances types, mask would bem5*:

In that case, before the member of such group/role will launch any tool/pipeline/configuration, dropdown list of available node types for them will be like this:
- Allowed tool instance types mask - this mask restricts allowed instance types only for tools' runs.
This mask has higher priority for launching tool than Allowed instance types mask. I.e. when both masks are set - for the launching tool, Allowed tool instance types mask will be applied.
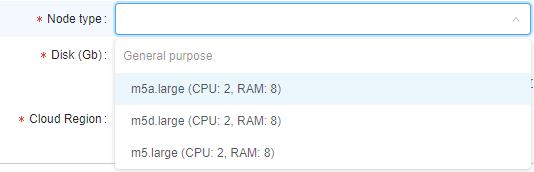
Example of usage: if you want members of the group/role to be able to launch tools with only "large m5..." instances types, mask would bem5*.large*:

In that case, before the member of such group/role will launch any tool, dropdown list of available node types for them will be like this:
Setting restrictions on allowed instance types is a convenient way to minimize a number of invalid configurations' runs.
Such restrictions could be set not only for a group/role, but on another levels too.
Next hierarchy is set for applying of specified allowed instance types (in descending order of priority):
- User level - i.e. specified for a particular user. How to configure see here.
- User group level - i.e. specified for a group/role of a particular user. If user is a member of several groups - list of allowed instances will be summarized across all the groups. How to configure - described above.
- Tool level - i.e. specified for a tool, that a particular user tries to launch. How to configure see 10.5. Launch a Tool.
- (global)
cluster.allowed.instance.types.docker- system preference that defines allowed instance types for tools. See 12.10. Manage system-level settings for details. - (global)
cluster.allowed.instance.types- system preference that defines allowed instance types for pipelines/tools/configurations. See 12.10. Manage system-level settings for details.
After specifying allowed instance types, all GUI forms that allow to select the list of instance types (configurations/launch forms) - will display only valid instance types, according to hierarchy above.
Allowed price types
This field may restrict, what price types are allowed for users of a specific group/role (for launching any job).
Example of usage: if you want members of the group/role to be able to launch only "On-demand" runs, select it:

In that case, before members of that group/role will launch any run, dropdown list of price types for them will be like this:

Setting restrictions on allowed price types is a convenient way to minimize a number of invalid configurations' runs.
Such restrictions could be set not only for a group/role, but on another levels too.
Next hierarchy is set for applying of specified allowed price types (in descending order of priority):
- User level - i.e. specified for a particular user. How to configure see here.
- User group level - i.e. specified for a particular group/role. If user is a member of several groups - list of allowed price types will be summarized across all the groups. How to configure - described above.
- Tool level - i.e. specified for a tool, that a user tries to launch. How to configure see 10.5. Launch a Tool.
Jobs visibility
This field may restrict the visibility of runs at the Active Runs page for users who are non-owners of these runs.
Note: this restriction is not applied to the users with the ROLE_ADMIN role.
Example of usage: if you want members of a particular group/role to be able to view all pipeline runs (for that pipelines on which members have corresponding permissions), select "Inherit":

Therefore USER4, that is owner of the pipeline, will view all runs of that pipeline, e.g.:
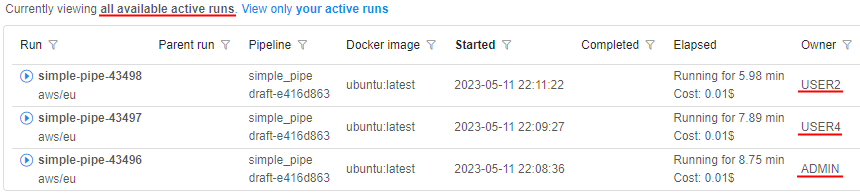
If you want members of a particular group/role to be able to view only own runs, select "Only owner":

Therefore USER4, that is owner of the pipeline, will view only own runs of that pipeline, e.g.:

If this setting is not specified for a group/role - for members of that group/role "Inherit" behavior is applied by default.
Next hierarchy is set for applying of jobs visibility (in descending order of priority):
- User level - i.e. specified for a user. How to configure see here.
- Group level - i.e. specified for a group/role - as decribed above.
- (global)
launch.run.visibility- system preference that defines jobs visibility globally. See 12.10. Manage system-level settings for details.
Credentials profiles
In these fields, specific interfaces can be specified for a group/role:
- Cloud Credentials Profiles - here, specific interfaces can be assigned for members of a particular group/role. Such interfaces allow to use seamless authentication in Cloud Provider services.
For details and examples see here. - Default Credentials Profile - setting allows to select one of Cloud Credentials Profiles assigned to members of a particular group/role as the default profile.
For details and examples see here.
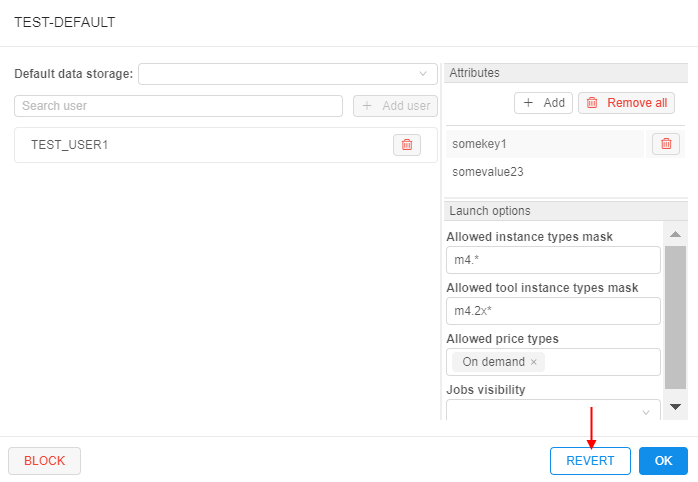
Possibility to revert changes
In certain cases, there could be convenient to undo all changes in a group/role profile when modifying it - without closing the form.
The admin has such ability:
- open the User management tab and then the Groups/Roles tab
- select the desired group to modify, click the Edit button to open the popup with the group's settings
- edit some settings
- if needed to revert done changes - click the REVERT button at the bottom of the form (Note: it's possible only before saving!):
- all done unsaved changes are reverted. The REVERT button becomes disabled:
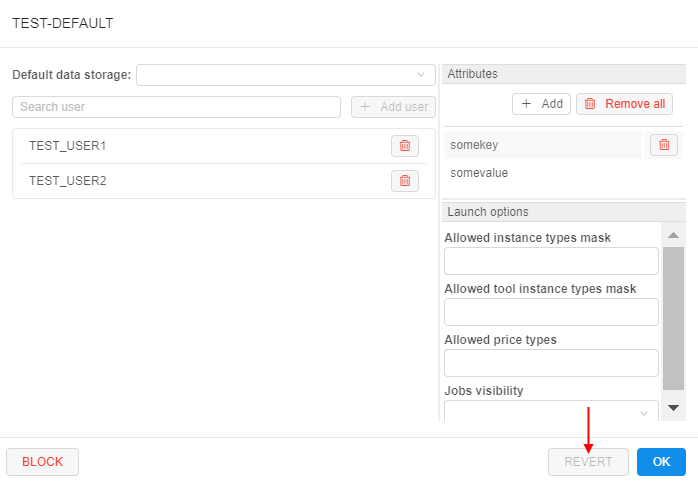
Note: in such way all unsaved changes of user settings could be reverted - Default data storage, Users list, Attributes and Launch options.
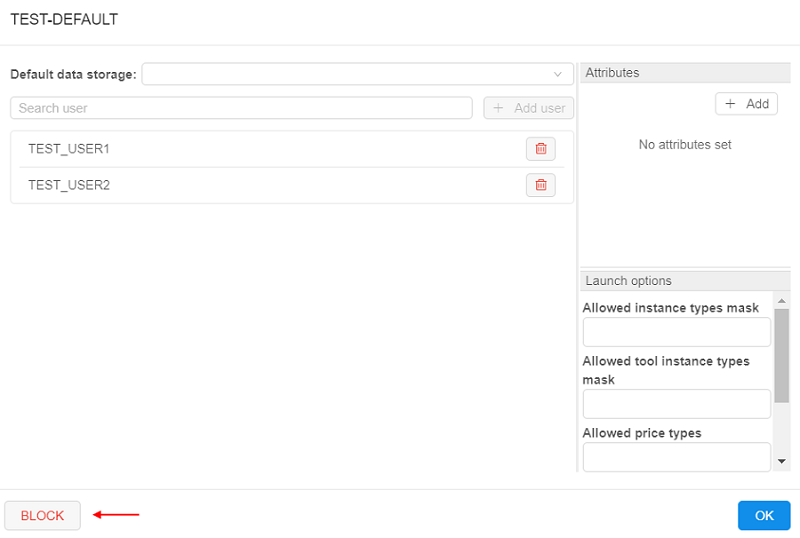
Block/unblock a group
To block a group:
- Open the Groups subtab at the User management section of the system-level settings.
- Click the Edit button next to the group's name.
Note: system groups are created by the SSO authentication system automatically and can not be found here. - Pop-up with the group settings will be opened.
- Click the BLOCK button in the left bottom corner:
- Confirm the blocking:
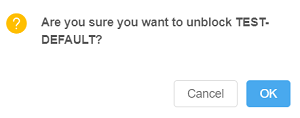
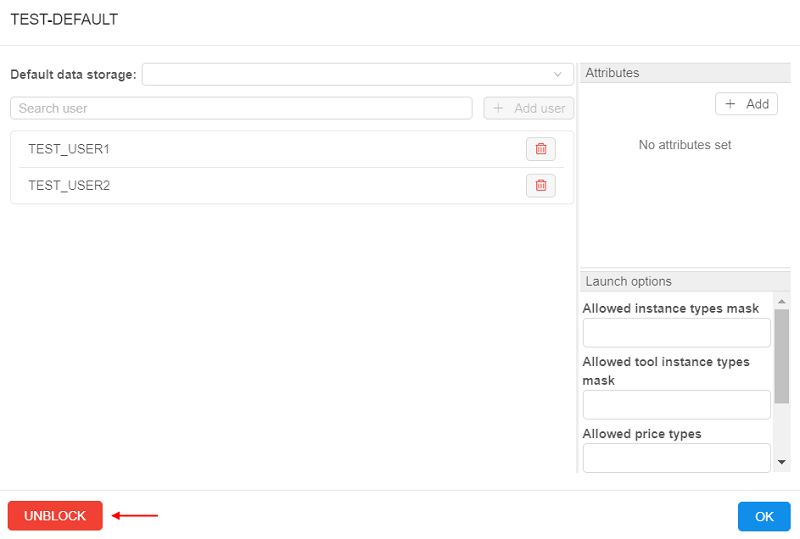
To unblock a group:
- Open the Groups subtab at the User management section of the system-level settings.
- Click the Edit button next to the blocked group:

- Pop-up with the group settings will be opened.
- Click the UNBLOCK button in the left bottom corner:
- Confirm the unblocking: